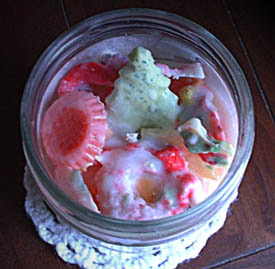
I made an entire tray of enjoyable cookies that were completely fat-free, calorie-free and sugar-free ... it should be mentioned that they are great for "dunking," although, of course, they were made with wax.

These candles are easy to make and burn very nicely. My "recipe" calls for paraffin or a soy blend pillar wax for the cookies and container wax for the candle. Giving it a wonderful "flavor" and scent throw are scents such as Sugar Cookie, Oatmeal Raisin Cookie, any type of sweet vanilla, cinnamon-spice, clove, or other bakery-type scent, including, but not limited to Apple Pie, Cinnamon Bun, Candy Cane, Peppermint, or other cookie or candy-types.
For this candle, you will need candy molds that resemble cookies, or little tart molds ... you could also make "cookie cutter cookies" by pouring wax in a tray to approx. 1/8-inch or so in depth and then cutting out shapes, although I personally prefer the little candy molds, which offer more detail in their dainty designs, as well as small size.

It is best if you can decide on your scent before making the cookies so you can scent the cookies to match the candle ... sometimes, you can use vanilla or spice in the cookies and then use a different scent for the candle that goes well with the cookie scent. If you use glitters, specialty glitters are best in a fine or medium grade, as extra-fine glitter can sometimes clog wicks while burning. The glitter is lightly sprinkled in the candy mold before pouring gel ... if you want to add more color to the cookies, sprinkle some grated colored wax in the molds before pouring, or tiny bits of wax.

For instance, this was done on some of my cookies ... little pieces of bright pink wax, for instance, with a pale yellow cookie.


Once your (primed) wick has been secured into your jar, pour your scented container wax and allow it to cool. Make sure to leave room at the top for your cookies.

To inset your cookies, you may either pour a little hot wax or use a heat gun to melt the top of the candle so you can secure the cookies. When this is being done, some heated wax should be waiting, as some "over-pouring" will be necessary, but not over the cookies ... just between them a bit. The cookies placed on the candle first will be on the bottom and will get covered up by more cookies, or hot wax, so save your best cookies for last (for the top of the candle.)
The retained hot wax can be used to splash in between cookies so they all adhere to one another ... just don't allow the wax to spill over too much, otherwise, you cover up your cookie designs. If wax should drip upon the cookies, wait a moment until it has slightly cooled, then see if you can lightly scrape or peel the drip off the face of the cookie. A heat gun can also be used for this step, as long you do not over-melt the cookies. Once all of your cookies have been applied, allow to cool and clip wick. I also like to clean off the glass as a finishing touch, just in case I got smudges all over it from sticky cookie fingers!

These are simply fun candles ... they are not intended to be elegant, only yummy! The addition of the cookies turns a simple container candle into a theme candle and the winter holiday cookies can be exchanged with designs for other holidays, such as hearts, shamrocks, pumpkins, and so forth. It is merely a twist on an old favorite ... milk and cookies.
Happy dunking!
P.S. A nice place for candy molds ... www.candylandcrafts.com

No comments:
Post a Comment