How much wax and scent?


Once you've decided to start on your candle project, it soon becomes apparent that you will need to calculate how much wax and scent is required for your container.  We'll start with the container itself so we can determine the fill line (the point to which it will be filled to), keeping in mind that if it has a lid that will go on it, we'll need to allow enough space at the top so the wick won't get crunched.  Typically, with whatever type of container, it looks best if it is not filled to the top, but has at least about 3/8ths of an inch left open at the top.

Note that this process entails using water in your container to figure it out, so this needs to be done well in advance of actually pouring your candle to ensure the container is absolutely dry, as any amount of remaining moisture will cause problems with your candle.


The weight we are looking for is the weight of water that has been poured to the desired fill line.  You can either weigh the container when empty, make a note of it and deduct it from the combined weight of the container and the water, or tare your scale so it only measures the water weight.


To figure out the weight of the wax required, there needs to be an adjustment made for the difference in density between the water and the wax.  The amount I've read for this is between 82% to 90% ... so the water weight is multiplied by something in between.  I'm going to go with 86%, which is another figure I've seen noted.  So, if the total weight of the water is 6.5 ounces, which is what it is, for instance, in an 8-ounce jelly jar, then the amount of wax will be 5.59 ounces.  This is the 6.5 (ounces of water) multiplied by .86 which is the percentage adjustment for the approx. difference in water weight to wax weight.


To figure out the fragrance oil, we first need an idea of the percentage of oil that will be used with the type of wax.  A paraffin wax may easily hold 10%, but some soy waxes may hold less, and that amount is going to vary based on the type of soy wax. This is important because if you add more fragrance oil than the wax can safely handle, there is going to be excess oil that could over saturate the wax.  Over time, especially in soy wax, the oil could partially sink through the wax toward the bottom of the candle, making the wax too fragrance oil heavy.  


For this example, let's use 8% as our guideline. If we have 5.60 ounces of wax, then our fragrance oil is going to be 5.60 x .08 = .448 ounce of scent.  If the wax can safely hold 9%, then this of course can be rounded up to a half ounce.  Adding this to the wax amount is going to make the total wax and scent six ounces, which is just about right for this size container. 


If your calculations result in a little too much scented and/or colored wax, there are lots of creative ways to put it to good use.  I never throw any wax away, except for spent wax at the bottom of burnt candles. All other wax becomes part of my scrap wax bin and there are usually some chunk candles up the road just waiting for it! 


Soy Votive Candles

These soy votive candles were made using 20% paraffin with RRD29 cotton wicks and I think they turned out very nice!  

This was the first time I've ever made several votive candles at one time.  Of course, to burn a votive candle, you must place it in a votive holder, as it melts over its edges.  These were made with Akosoy 5702-02-02 (also known as Golden Wax 464) and 141mp (melt point) straight paraffin.  The wicking was bought by the yard, so I could cut the wicks to the length I needed (2 3/8"), using a 15mm wick tab.  

It took me a little while to get the hang of placing the wick.  With votives, there are a couple of ways to handle the wicks.  One way is to purchase votive molds that come with wick pins and insert the wick after the candle has hardened.  I preferred to try what I feel is a cleaner method, so got molds without the wick pins.  

To place the wick, the candle is poured, then allowed to cool just a bit until a skin forms on the top, then the wick is put into place by pushing it through the semi-cooled top skin layer until the wick tab sits on the bottom of the mold.  It took a little practice in learning to do that so they're centered & placed correctly, so my second batch worked out better than the first, but I like that method all the same.  

I added a little color to them by dropping little flakes of dye on the surface.  (You can see that I did not color the top pour on some of them.)  Sharing this has made me want to make some votives!  I think I will do that this afternoon!  :)


Speckled Container Candles 2 - Color Disks

I've had a little more fun making speckled candles since my last post, sorry for the delay! 

You can use a variety of little molds to make your colored batches, I use a silicone cupcake mold for mine.  Melting enough wax to fill it only about a third of the way full and generously adding color in the form of dye chips, blocks, powder or liquid dye (preferred) -- in other words much more dye than you would normally add to the wax if it was going to be a candle.  You can judge this as you are working with it, but, for instance, adding about three to five drops of color for starters to make it concentrated.  If you prefer to make it weaker for a lighter effect, then only add a drop or two.  Remember, when you are using it, you will be sprinkling it in little flakes if you wish to achieve the speckled look.  

Here's an example of a couple of colors I've been working with ... the dark color disk is the concentrated color and the lighter ones are an example of how using a small amount will turn out.  Of course, these can also be used to color a candle with a solid color.  To make speckles, you shave off or chip off little pieces.  You can have a lot of fun mixing your own colors for your candles by making these ahead of time, and compared to using liquid dye, they aren't nearly as messy, giving you much more control on the amount of color you're using, as liquid dye is very easy to over color with ... just ask me how I know!  


Speckled Container Candles 1

These were fun to make!  The color was added after the candle was poured and started to cool by using pre-colored soy wax either broken off into little chunks or shaved off into thin flakes.  The uncolored soy wax in the container needs to cool to under 120dF before adding flecks of color, as these were, which was closer to 100dF.  As long as a skin has not begun to form on the surface, the color shavings may be safely added without dissolving too much.  If the wax is too hot, the color will simply color the wax as though you've added it in the melting pot; cooler wax allows for the sprinkles to swirl or give a sprinkled effect.  You kind of have to get a feel for it and you may have to move the little chunks or flakes of color around with a metal pick, being careful to not overwork them, otherwise you'll lose the effect.  I'll share more about this method soon!


Christmastime Carving Lesson

I spotted this video from Dollywood in Pigeon Forge, Tennessee in the foothills of the Great Smoky Mountains National Park.  Recently, Dolly Parton made a public service announcement with Smokey Bear to remind people of fire safety, especially in dry conditions.  Unfortunately, a terrible wildfire event has occurred in and around the Chimney Tops area near Gatlinburg.  Here I will share Dolly's fire prevention message as well as a nice video from Dollywood about carving candles. 


Dolly has helped in sponsoring a fund for fire victims, for more information, see:
https://dollywoodfoundation.org/

Comparing Soy Waxes


These are a few notes comparing a few soy container waxes.
The Golden Brands waxes are very nice; I have used GW415,
GW444, and GW464.  Of the three, the GW415 is a 100% soy
wax without any additives and it is poured at a cooler
temperature than the other two.  The appearance of the
GW415 varies just a bit, the surface isn't quite as
smooth, but the lower melt point seems to help with
glass adhesion.

Choosing which wax you prefer to use has much to do
with your own preferences, availability, scents,
containers, etc.  For instance, if your glassware
is clear and you wish to try to avoid wet spots that
will be seen, you may be more comfortable with a
lower melt point wax; or, if you want to be able to add
more scent, a wax that has a higher fragrance load may
be more suitable for you.  So far, I've only tried these
three waxes, but plan to see what the differences
may be with some others, such as Cargill’s NatureWax C-3.

Pouring temperatures vary and results may be dependent
upon the temperature of your work space or glassware.
Your pouring temperature can have something to do with
wet spots upon the glass, frosting, or surface flaws.
For instance, if you pour too hot, the surface may crack,
so after adding your scent and stirring well, be sure to
allow for cooling prior to pouring.  If your work area
is cool, warming your glassware on an oven top or a
hot plate can help prevent wet spots or other issues.
If the top of your candle has any flaws and the surface
requires smoothing, a light brush with a heat gun should
take care of it.  Some sources say that the pouring
temperature should be about the same as the melt point
temperature.  Soy candles should be allowed to cure
for about a week before burning to allow the scent
to properly bind with the wax. 


Here are some specifics and comparisons ...

Meltpoints:

GW415 - 120-125
GW444 - 120-125
GW464 - 115-120
C-3 - 125-130dF


Fragrance Loads:
GW415 - 6%-9%
GW444 - 9-11%
GW464 - 7-9%
C-3 - 6%


Pouring Temperature:

GW415 - 90-100dF
GW464 - 125-145
GW444 - 125-145
C-3 - 120-165°F


Other Notes:

GW415 - Blends with other waxes, such as paraffin or beeswax.

GW464-  
Does not mix well with beeswax, but mixes with paraffin.


The source of the above information is wax manufacturers' websites in combination with some information from resellers or tips gathered personally & from other crafters. 


Wick Comparisons

Comparing high temp paper to square braid cotton in a small candle

I've been testing a few different wicks for a small soy wax tart candle.  I am using Golden Brands 415 soy container wax.

I will be making these candles with a whipped cream (soy-paraffin blend) topping, but for my test, the whipped wax was only applied to the edges.  Since my test, I have made a test candle with the full topping (total weight of candle is 2-ounces) using a 2/0 and it burns wonderfully for about nine hours or so.

The wicks I have tested were in a candle poured into a foil tart pan 2.75" across ... HTP 41, HTP 52, and square braid cotton 2/0.  My favorite turned out to be the cotton wick. 

I tested these because I had some sample HTP wicks in my stock and wanted to see how they would compare.  According to references about these wicks, either one of them looked as though they might suit this size candle based on the melt pool size for these wicks.  Most of the size charts I looked at seemed to be for paraffin wax, however, and not for soy.

The "41" is suggested for small candles of about 2" and the "52" is suggested for a candle approx. 2-2.5".  

According to one source the flame heights for these wicks in paraffin is 1.41 for "41" and 1.50 for the "50."  In these soy candles, I would not say that these flames reached those heights.

When my three test candles were first lit, they all looked about the same, but as time went on, there was a definite difference in their performance. 


By the end of the test burn, the cotton 2/0 wick had melted most of the wax to the edge of the candle ... the HTP wicks did not accomplish this and those candles still had wax on the edges when they were finished burning.

The HTP 41 had a much smaller flame and actually went out at one point, it was relit, but did not perform well at all in this candle.  The HTP 52 burned alright, but did not create a melt pool out to the edge of the candle.  With the cotton wick, nearly all of the wax was consumed by the end of the burn.  You can see in the following picture that the flame height and appearance of the cotton wick looks much difference than the HTP wicks.


These are close-ups of all three wicks ...


While looking at specifications for the various wicks, it's interesting to note the melt pool size, flame height, and burn rate,  as well as any other specifics about any particular wick.  If you are new to making candles, this is really an important part of your candle design and don't get discouraged if a wick doesn't work out ... it might be perfect for another type of candle.  Always make sure to test burn your candles before you give them away, recording your type of wax, amount used, size of container, any additives used, etc. 

I am not a wick expert and I see there is a lot to learn!  This is why I decided to post my results.  Maybe if you are doing a similar project, this can save you some time! 

You may see other wick posts from me in the future!


P.S.  I would also like to add that I have seen instruction pages or videos that mention that when working with raw wick in certain candles, that there is no need to dip them in wax before securing them as "they will stand up by themselves" (for instance).  In my experience, wicks should always be primed, regardless if they are rigid or not ... I was taught that the priming has to do with the burning, not the position or rigidity.


Questionable Candles


Most likely I will be adding to this topic, as I've been seeing some things that really make me scratch my head lately!  

In the following video, which is supposed to be about "realistic" dessert candles, I found it very perplexing.  

Also, I would like to mention that the word "embed" is pronounced just as it sounds.  Most gel candle makers know that one of the fun things about gel candles is that you can embed decorations, such as marbles, glass figurines, or hard wax shapes (approx. 165 dF wax) that are created in candy molds.  The reason they are a hard wax has to do with the embedding process (not what this post is about), for instance, in a glass where the partially-cooled gel is poured (the hard wax has less of a chance of melting.)  

These wax pieces can also be used to adorn fruit bowl candles, for instance, and in some cases they need not be created with such a hard wax.  In any case, the term we've come to know them as is "embeds."  

When using embeds in a gel candle, whether in a glass or bowl, there are a couple of things to make sure of ... one of them to make sure that they do not bump up against the wick, which throws it off-center.  In the case of the video below, the wicks are at a slant, which is not a safety consideration so much in a bowl candle of this sort as it is in a glass container, but it still doesn't look as nice. 

Another thing to make sure of when making dessert candles is to keep in mind what is going to happen when the candle is burning ... the wax needs a place to pool.  If there is a "cave" of some sort around the wick, a wick can burn straight down until it meets up with pool of some sort and this is not the way a candle should burn!  On the subject of wicks in gel candles, 1/4" has always been the standard, acceptable length for the wick ... both in presentation as well as in safety instructions.  

As much as I do not like to criticize crafters in their art, when it comes to candles, imo, both safety and presentation go a very long way!  I see a lot of things wrong about the candle in the following video and it bothers me when I see instructions given that do not follow safety concerns or explain things correctly.

Now for one of the videos I found at youtube ...


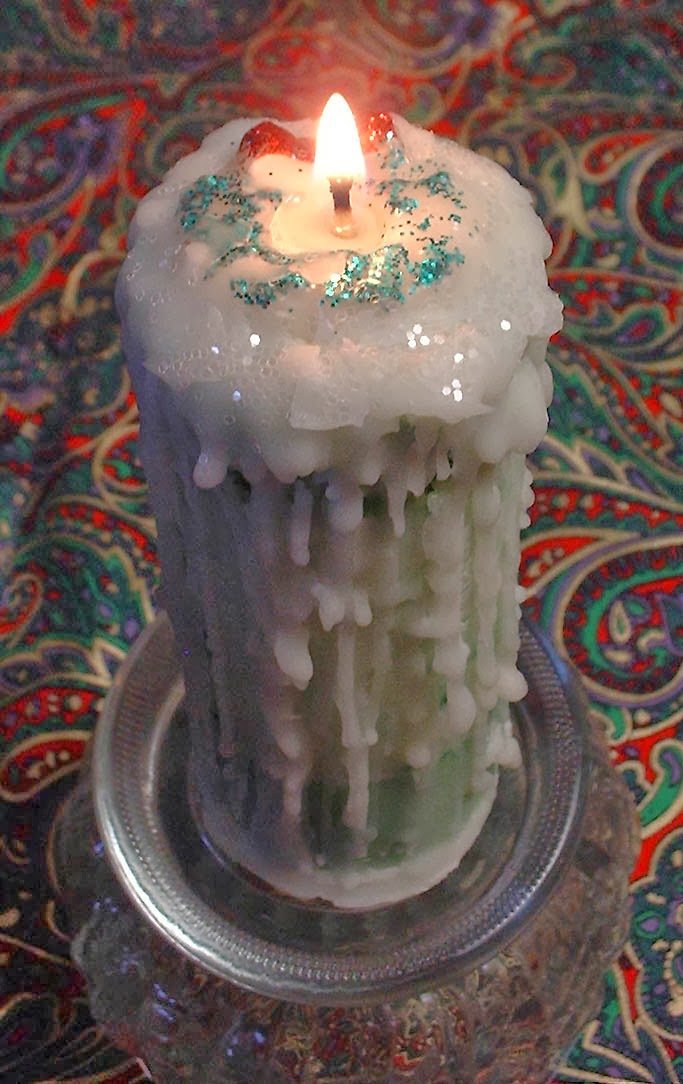
Drippy Winter Pillar Candles


These were fun candles to make ... and to burn! 
Each candle was topped with a glittered wreath 
in the center.  The wreaths were made with candy 
molds, with specialty glitter dusted into the molds
before pouring the scented wax.  I used a sweet 
bayberry for these candles, which was wonderful.

The interior of my candle mold was lightly coated
with mineral oil.  Then, using a cheese grater and 
a green coloring block, little specks of colorant
were created that were then sprinkled into the 
inside of the mold ... the candle was poured in 
a few layers, including light green (this was a 
bright green mixed with a hint of turquoise) and
white, making for an interesting pattern. 

Then, the candle was dripped with white wax 
over and over, with wax being poured on top first, 
placing the wreath in the center, and wax continued
to be poured around the edges to drip over the sides
of the candle.  At the completion, some wax was 
poured onto a plate and the candle set into the hot 
wax to finish the bottom, covering the square wick 
tab, which is the second to last photo here. 

For my next drippings ... Valentine's Day!!


Mini Cake Candles

This autumn, I am beginning my candlemaking 
by creating small "high cakes" ... I've got more 
"in the oven," but wanted to share some of these 
in the meantime! 


This is a mini crumb cake ... 


Halloween Floating "Eyes" & Full Moon Gel Candles


The time of year is coming up to start thinking 
about novelty candles for the autumn season.  
If you are looking for a new idea, you may wish 
to create a different type of gel candle ... this one 
is a jar full of "eyes" for Halloween.  I made this 
candle years ago and it's still holding up!  


My "jar of eyes" candle ... gee, what a kooky idea 
that was! ... is scented with green apple scent, 
but there are many scents that go with this design. 
And, your "eyes" don't have to be green!  

If you would like to make such a candle, you will 
need a bonbon type of candy mold, some marbles, 
some hurricane candle (high melt point ... I think 
it's around 165 degrees) paraffin wax and all of your 
gel candle essentials.  The high melt point wax is 
important, as you don't want your wax to melt when 
your gel is poured, plus it will hold up better over 
time and won't become too cloudy.  This candle 
became a little cloudy over time, but it's been 
several years.  

To make the eyes, you simply place the marble
in the base of the bonbon mold ... this mold might 
be referred to as a cherry bonbon.  Pour your wax 
over the marble ... it's best to allow wax to cool 
just a bit before pouring into plastic candy molds
so you don't warp the mold.    When your marble 
bonbons are cooled, release them from the mold. 
If wax is covering the marble, which will most 
likely be the case, you can scrape it off, being 
careful to not scratch your marble, or melt it 
off carefully with a heat gun ... but, a hot spoon 
can also help move the wax away from the 
marble so the glass "eye" is exposed. 


My gel was colored a light color green ... be careful 
to not color this too dark!  It's also important to make 
sure your gel is not too hot when pouring ... allow to 
cool a bit, and pour your candle slowly.

To fill the jar with the bonbons, I first poured 
some gel into the jar and turned it all around to 
coat the entire inside of the jar with a thin layer 
of gel after securing my wick. Then I positioned
some of the "eyes" in the jar and poured some 
slightly cooled gel over them, adding more eyes
and more gel until the jar was filled with the 
"eyes" to about a half inch from the top ... then
I poured enough gel to give the top of the candle
a level surface.  My candle cooled on a sunny 
windowsill, and had very few bubbles!  Just a 
bunch of eyes staring out at me!

Another design that may interest you also employs
a candy mold ... this one being a thin mint type of
mold.  This "full moon" candle may give you lots of 
ideas!


After the wick was secured, the inside of the jar 
was coated with gel ... then some gravel was 
carefully sprinkled in the bottom.  
Another inside layer was poured, although this 
time, the "moon" was pressed into the gel up 
against the glass immediately ... then, another 
layer was poured, with the jar tilted in all 
directions so gel encased the moon, with a 
bit of glitter for embellishment.  Finally, 
the remainder of the candle was poured. 
The moon doesn't really start to glow until 
the candle has burned down a little, but when 
the flame gets into the center of the candle, 
it really has a nice effect!


Trees in Snow Candle


The holiday season can be a real challenge when it comes to deciding what type of candles to make for gifts.  Beyond extreme-design candles that you might make for family members or close friends, there are the other designs that are more suitable for associates, co-workers, neighbors, or as gifts to mail away.  The main factor I personally see in the "mail away" candles has to do with fragility of the design and the weight.  The fragile part is a bit easier to deal with, as wrapping and padding can often overcome much of that aspect, but the weight is another issue entirely.  With postage rates taking a bit of jump between First Class and Priority Mail, it's nice to be able to keep the weight low, especially if you want to send candles to several people.  Sending several candles to a few people usually entails Priority Mail ... but, if you go over the one pound rate, the cost is going to take a little bit of a jump.  Some people find votive candles a good option, as you can send many candles without too much worry about the weight issue, but I personally need something in between my heavier chimney candles, for instance, which can vary from about ten ounces to almost a pound, and very little candles.  First Class rates are for packages up to 13 ounces, so if your candle weighs around six ounces, even with packaging, it will qualify.


Here is a candle design I've made that doesn't weigh much, but has a lot of personality ... I think so anyway!  Believe it or not, I have used a plastic cocoa container for my mold.  The trees are made with a candy mold.  And, under the icy surface of the "pond" where the wick is, lies just a bit of blue candle gel, making this candle burn longer and giving the "pond" a nice watery effect when the ice melts off.  
I made these last year and I'm going to try my hand at it some more shortly ... my trees sunk into the snow a little too much, so now I know to wait just a little longer before setting them in.  


I started with the base of the candle, which is a light blue. When this cooled, I poured some white wax, making an indent in the center when the was was partially cooled, and placed just a bit of candle gel in the center.  Then, I poured more white wax, this time, inserting the trees while the wax cooled.  All of this took place while still in the mold.  Then, when everything was cooled, I gave it a cool bath and removed it from the mold, adding a bit of snow to the trees and a hint of glitter ... anything that spilled over the side was carved off.


This candle (below) was the first one I made ... I was a little "off" in trying to work with this design ... too much ice or snow or something, kind of lost the "look" I was shooting for.  But, it shows how awful something you may have in mind can look before you get the hang of actually creating something a little more like what you are envisioning!  I'll see how I do this year and hopefully have a successful update for you! 


Happy Holidays!!


Molded Fizzing Bath Salts


Here is a design idea for
molded bath salts that can be fun,
especially if you like a bit of a
challenge! Now, please don't ask
me why I tackled this idea, but I can
tell you that I was after some shell
designs for fizzing molded bath salts
(aka bath bombs), and the majority of
shells are very fragile ... dainty
designs do not seem to hold up in
a molded bath salt. From my experience,
molded salts need a sturdy and solid
mold, otherwise little appendages can
break off very easily, either during
mold release or during any handling
after packaging.

Although this particular method is
a bit more difficult to make than using
candy molds or other simple molds,
the end result is a nice handmade
bath salt with an imprinted design ...
in this case, a sea star, (otherwise
known as a starfish).  It can be a
bit tricky at first, but once you
get the hang of it, you can create
unique molded fizzies with a variety
of designs, such as flowers, leaves,
butterflies, shells and other shapes.


The following is the recipe I have
the most experience with. This is
for a single batch of the mixture,
which can be doubled if preferred.
But, for beginners, a single batch
is best, as once the mixture gets
moistened and is ready for the molds,
you need to work fast ...
so it's best to start off making
small batches and then after some
practice, a double or triple batch
may be easier for you to work with.


Here's the recipe ...

2 T. citric acid (fine or extra fine)
2 T. corn starch
4 T. baking soda
1 T. light carrier oil
1/2 t. scented oil

Witch hazel in a spray bottle

Bath Salt Mix - Dry


There are several carrier oils you
can use ... for instance: sunflower,
almond, apricot or peach kernel,
rice bran, and grapeseed all work well.
Some carrier oils can be too heavy
for bath salts and will be too oily,
such as castor. This is important
to note, not only for the skin, but
also for the shower or bath tub!
Your scented oil can be either
fragrance oil or essential oil,
but if using essential oil, you
only need a few drops or so.
(You will find additional oils
mentioned at the bottom of this post.)


After your dry ingredients have
been measured and mixed together,
add your oil and scent and mix well ...
this mixture can sit for as long as
you need it to until you are ready
to wet your mixture to press into molds.
Then, when you are ready to mold your
mixture, (and not a moment sooner!),
spritz the mixture with witch hazel.
Rubbing alcohol (isopropyl)can also 
be used, although it has a slight
odor and is not a natural ingredient.
Unless you have purchased a true
witch hazel hydrosol, most witch
hazel has some isopropyl in it.


Bath Salt Mix - Wet


The number of times you will need
to mist will vary depending upon your
spray bottle. My misting bottle that
I use for these requires that I depress
(spray) about seven times for a single
batch ... as soon as they've been
spritzed, mix well with a fork and
hurry to get your mixture pressed
into molds. A dough scraper works
quite well to level out the backs
of your molds once they've been
filled. Tip ... if you scrape in
the direction of nearby empty molds
on the tray, some of the excess
mixture will fill the empty molds
and you will have less waste.
You want the mixture to be wet 
enough to stick together in the 
mold, but not overly wet ... 
it should be similar to a "dough" 
texture, NOT a "batter!"


If you wish to add some color,
soap-safe colorants can be used,
or, you can mix some powdered
botanicals for natural colorants
into your carrier oil before mixing.
Cosmetic grade oxide powders can
also be mixed with your oil to
dissolve ahead of time ... if you
add them directly, you can make
speckles, if you should desire
such a look. Food coloring is
not preferred, although they
can work in small amounts if
you want to practice making
these prior to ordering your
real supplies.


The following design came about from
a combination of two mixtures being
pressed into one mold ... it kind
of gives a crumbly effect. For instance,
a "tart" such as this could be scented
with a berry scent and with the use
of another color, with the same
mold, another type of scent can
be used to create an entirely
different result.

Molded with two mixtures at the same time


To make an imprinted design, such as
this sea star, you will need a shape
to insert into the bottom of the mold.
This is a plastic piece, which has
been coated with some carrier oil
and placed in the bottom of a
mini muffin tin. (It is my opinion
that this step keeps the plastic
shape from sticking to the bath
salt mix.)  Simply press your salts
mixture into the mold, making sure
you have pressed firmly up against
the embossing piece. After your
salt mixture has hardened enough
for easy removal from the tray
(tips will follow), use a thin
metal pick (a poultry lacer does
the trick for me) to gently pry
the edges of the plastic design
piece (sea star in this case)
from the bath salt, and allow
it to sit, untouched to harden.


Ready for mixture to be pressed into tray


Whether using the imprinted design
or a candy mold design, allow the
mold tray to sit untouched after
filling the molds until the mixture
has dried ... depending on the humidity,
this can be anywhere from fifteen
minutes to a half hour. To release
from your mold, you will do these
in similar fashion to a pineapple
upside down cake ... secure and
flip over. For instance, if using
a candy mold, place a piece of wax
paper over the filled tray and then
a rigid piece of cardboard or a
flat tray over that and turn it
all upside down (making sure to
securely hold the wax paper and
rigid backing or tray in place)
so the mold will release its
contents onto the wax paper
and tray. By using a rigid
backing of some sort, or a tray,
you can then move your molded
salts to a dry place where they
can cure (harden) before placing
them in an airtight wrapping or
container; this can take about 
a day or so.  (If humidity is high, 
they can be placed in an oven
that is not turned on.)


Ready for shaped insert to be removed


When removing the shape, it seems 
to make things easier if you first 
gently pry the outside edges of it 
up first, all the way around, then 
go around again once it has been 
loosened and it will then come up 
easily.  Be careful not to disturb 
the bath salt when lifting the piece
away from it ... the use of tweezers
may help.

A word of caution ... never let
bath salts sit in the molds for
too long ... they can stick to
plastic candy molds, or in the case
of using a plastic imprinted design,
it can make it almost impossible
to remove the plastic design piece.

These can be used in the bath, as
well as in a shower ... simply use a
large plastic tumbler with a small
bath salt, or a portion of a larger
one, fill with water, and use
for an emollient rinse.

~~~~~~~~~~~~~~~

Some other light carrier oils:
Camellia
Hazelnut
Hemp Seed
Jojoba


Some that are heavier and most likely
should not be used in bath salts: 
Avocado
Babassu
Macadamia Nut
Olive


Note that we have purposely left
off some available oils as we have
read that they can go rancid rather
quickly. Since some people keep
bath salts around for awhile,
it may be best to select oils
that have a longer shelf life.
However, grapeseed is listed,
as it's considered a nice,
lightweight oil, although it
may not have a prolonged
shelf life. Carrier oils
that have gone rancid take
on a funny smell, so it's
best to keep your oils in
a cool, dark place ... this
includes your refrigerator.
Other items, such as hydrosols,
are also best kept there ...
just make sure you have
properly labeled your bottles
so everyone else who uses
the refrigerator is aware.
Although natural ingredients
are not toxic, one would surely
be surprised to take a sip of
witch hazel if they thought
it was water!

~~~~~~~~~~~~~~~~

Happy Molding!!
Kathy

Finished