 I made an entire tray of enjoyable cookies that were completely fat-free, calorie-free and sugar-free ... it should be mentioned that they are great for "dunking," although, of course, they were made with wax.
These candles are easy to make and burn very nicely. My "recipe" calls for paraffin or a soy blend pillar wax for the cookies and container wax for the candle. Giving it a wonderful "flavor" and scent throw are scents such as Sugar Cookie, Oatmeal Raisin Cookie, any type of sweet vanilla, cinnamon-spice, clove, or other bakery-type scent, including, but not limited to Apple Pie, Cinnamon Bun, Candy Cane, Peppermint, or other cookie or candy-types.
For this candle, you will need candy molds that resemble cookies, or little tart molds ... you could also make "cookie cutter cookies" by pouring wax in a tray to approx. 1/8-inch or so in depth and then cutting out shapes, although I personally prefer the little candy molds, which offer more detail in their dainty designs, as well as small size.

It is best if you can decide on your scent before making the cookies so you can scent the cookies to match the candle ... sometimes, you can use vanilla or spice in the cookies and then use a different scent for the candle that goes well with the cookie scent. If you use glitters, specialty glitters are best in a fine or medium grade, as extra-fine glitter can sometimes clog wicks while burning. The glitter is lightly sprinkled in the candy mold before pouring gel ... if you want to add more color to the cookies, sprinkle some grated colored wax in the molds before pouring, or tiny bits of wax.

For instance, this was done on some of my cookies ... little pieces of bright pink wax, for instance, with a pale yellow cookie.


Once your (primed) wick has been secured into your jar, pour your scented container wax and allow it to cool. Make sure to leave room at the top for your cookies.

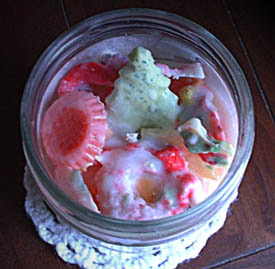
To inset your cookies, you may either pour a little hot wax or use a heat gun to melt the top of the candle so you can secure the cookies. When this is being done, some heated wax should be waiting, as some "over-pouring" will be necessary, but not over the cookies ... just between them a bit. The cookies placed on the candle first will be on the bottom and will get covered up by more cookies, or hot wax, so save your best cookies for last (for the top of the candle.)
The retained hot wax can be used to splash in between cookies so they all adhere to one another ... just don't allow the wax to spill over too much, otherwise, you cover up your cookie designs. If wax should drip upon the cookies, wait a moment until it has slightly cooled, then see if you can lightly scrape or peel the drip off the face of the cookie. A heat gun can also be used for this step, as long you do not over-melt the cookies. Once all of your cookies have been applied, allow to cool and clip wick. I also like to clean off the glass as a finishing touch, just in case I got smudges all over it from sticky cookie fingers!

These are simply fun candles ... they are not intended to be elegant, only yummy! The addition of the cookies turns a simple container candle into a theme candle and the winter holiday cookies can be exchanged with designs for other holidays, such as hearts, shamrocks, pumpkins, and so forth. It is merely a twist on an old favorite ... milk and cookies.
Happy dunking!
P.S. A nice place for candy molds ... www.candylandcrafts.com

It's always nice to give handmade candles as gifts.
One of the challenges can be trying to mail candles
to friends or relatives that weigh under a pound in
order to make it possible to send candles off to as
many people as will fit within your candle shipping
budget! Of course, if you have a sufficient budget,
this does not apply to you ... but, if you do have one,
then creating fun candles on the smaller side can
have its advantages. Since wax is heavy, this may
leave you feeling that you have very limited options.
But, with creativity on your side, you can easily
make pretty candles on the small side, without
simply sending plain votive candles.
This candle design is actually an "embellished
votive" in a sense ... it's a votive candle dressed up,
and it shines in a very unique way ... with an inner
color that softly lights up behind a curtain of "lacy"
wax and dripped wax. You may be familiar with
ice candles, but if you are not, then here is your
first experience with how to make these on a
small scale.
Ice candles are typically seen in a large design
with lots of holes in the outer wax layer ... they are
typically made with a pillar candle in the middle and
an outer shell of wax, with the outer mold being
either round (using a candle mold), or square ...
often using a tear-away recycled mold, such as
a half-gallon paper milk carton. On these lines,
the votive candle design can be used with a
quart milk carton (or cream container) ... votive
in the center and the outer mold a square.
In this design, I've gone with a round outer mold,
using a plastic sour cream container as the mold.
Of course, if you have molds for these, you are a
step ahead, but for a "on the fly" candle design
with on-hand materials, you can use this for your
candle, with a paper cup as your votive mold.
If you haven't had a chance to invest in molds yet,
then here are a couple you most likely can find
fairly easily.
The finished result of this candle weighs about
7 ounces, and if you use a soy-paraffin wax for
your votive, the burning time is about ten hours.
A nice little gift ... very pretty while it's burning too.
Of course, you can come up with plenty of other
design ideas, but for this candle, I went with a
"snowy" or "icy" theme. My finished candles
are a light blue in the center, but my first practice
candle ... the one I initially took photos of during
the process, was not colored, but the candle
scent was amber, so it turned the wax yellow.
This is one thing you will need to watch out for,
by the way ... so, for my blue candles, I will be
using a fragrance oil with minimal to no color.
Here is the process ... first for the votive.
I used a "Dixie Cup" for this candle, poking a
little hole in the bottom of it with a poultry lacer
(thin metal pick) and threading a pre-waxed wick
through the hole. Sufficient extra wicking is left
available at both ends of the candle ... this will
make more sense later. Once the wicking is
through the hole, if you pour just a little wax in
the bottom and allow it to harden around the
base of the hole, it should seal up adequately
enough to be able to pour the candle without
any wax dripping through.
 Once this candle has molded, it's time to make
the ice candle. For my outer shell mold, I have
also poked a hole in the center bottom, however,
this hole needs to be poked through with the tip
of a knife or the like.
When this is done, then the votive is set inside
the mold, with the wicking threaded through the hole ...
you may need to play with this a bit to get it right,
but if you left yourself some extra wicking, it's not
difficult to do. Remember that the top of your votive
is going to go into the "bottom" of this mold.
If you string the wick through this way, then
you will have a cleaner finish when your candle
is coming out of the mold. At this time, you will want to be melting your
wax for your outer layer. It can be a bit tricky
to determine how much to melt, but a basic
guideline would be as much as will loosely fit
into the outer mold ... this should be an adequate
amount, with some left over for over-dripping.
Making sure your votive is well centered, small,
broken pieces of ice can be set within the container.
Ideally, the pieces should simply be randomly
scattered ... it should not be too thick with ice, as
you must remember that wherever there is ice, there
will be no wax and for burning purposes, you want there
to be as many areas of wax as possible, with just small
holes here and there. In bigger ice candles, with a
larger center core candle, large holes may be desired,
but in this little candle, it's best if we give the votive a
bit more support. In this way, your candle will burn
without losing it's wax as much through the holes.

However, ice candles normally do tend to drip through
the holes, so they must be placed on a plate or candle
holder when burning. While on this note, if you want
your votive to be a bit thicker, or if you want to give it
a frosted look, dip it in wax a few times before mounting
it in the outer container mold.
This part can either be done at this point or later ...
the clipping of the wick for the bottom of the candle.
I used a square wick tab that sets into the wax.
If you do not have these types of tabs, you can simply
leave it without a tab.

Now that the ice is arranged, it's time to pour the outer
layer. Make sure you have colored (if wished) and scented
your wax. This wax was not colored, but some stearic
acid was added to give it a little more opaque quality.
Simply pour the wax around the votive and onto the ice
pieces until the level reaches just to where the bottom
of the votive is ... make sure your candle is sitting on a
level surface while it cools.
When hardened, it's time to see what happened ...
always the fun surprise part of candle making. Take
the candle out of the mold (or tear the mold away if
using a milk container, etc.) For finishing touches,
place the candle on an old plate or pie plate that you
don't mind pouring over, and do a bit of over-pouring.

Final wax touches ... wax was lightly poured all
around the edges of the candle, with excess wax
"mopped up" from the spilled wax with a small metal
spatula, smearing the wax along the sides of the candle.
During this process, I also "topped up" the center of
the candle, pouring over the votive so there was a
clean, smooth surface on top.

Now is a good time to mention embellishments that
may sit on top of the candle. Certainly, you can come
up with many ideas of your own ... mine, for this candle
was a snowflake. A snowflake candy mold was used
to create these, with some glitter placed in the mold
ahead of pouring. Although this got a bit covered up
when I dripped wax over the candle near the completion
of the candle, the glitter made its presence known while
burning, which is a pretty effect.
To place the embellishment on top of the candle, heat
a thin metal rod to poke a hole in the center of the
wax embellishment, then string the wick through it
and center it on top of the candle. There should still
be sufficient "additional" wicking available for you at
this point ... enough to raise the wax embellishment
up off of the candle just a bit so you can pour just a
bit of hot wax underneath it. Press down immediately
to form a bond between the wax embellishment and
the top of the candle.
You may wish to finish up with a few slow drips
of wax around the edges and some glitter (I used
clear glitter) sprinkled along the outside edge.
If you let your wax cool down a bit in your
melting pot, you can drip wax down the sides of
the candle that will create a true drip effect
(in other words, the wax won't run down as quickly).

Once all is cooled down, your wick can be
clipped and your candle is ready for wrapping
and sending off ... but, remember, for your first
one, it's very important to burn it yourself as a
test burn so you know for a fact that all is well
with your candle design.
 (After I make some more of these, I may post additionalphotos.)
A nice place to start in your search for candy molds ...
Candyland Crafts
It's a great time to make some ice candles !!
 It's the holiday season and time to come up with some candle ideas! Where do you start? Every year, I "just start" somewhere ... and by the time the season is in full swing, I start to create designs that begin to take form. For me, I need to be able to experiment a bit to get into the swing of things. One first place to start is the decision of what type of candles and what type of wax or waxes will be used . For instance, container wax, pillar wax, beeswax, candle gel ... a light gel for containers? ... a medium gel for embedding? ... a heavy (firm) gel for stand alone?
Once you have decided if you want to make container candles or molded candles, then there is the design factor ... will they be decorated in any way? If plain, that's fairly simple, as the glassware you select will really be the main object of attention. And, you could add decorative embellishments attached to the glass that are non-flammable. For pillars, chunk candles with various colors can be interesting, or with dripped colors of wax on the top or sides. For novelty candles, you can always go with various themes. For instance, one year, I went with a cookie or candy theme and started off making the "cookies" first. Here are some examples of what I did ... 
 These "cookies" were created with a high meltpoint wax, so, when used in gel candles, they didn't melt, as long as they were embedded in such as way as to not be overly- exposed to heat. Or, they were used on top of a container candle, or on a dessert type of candle in the "whipped cream" ... so, you see, there are many ideas you can begin to work with that can be a lot of fun. Candy molds were used to make them, with the glitter sprinkled into the molds before carefully pouring the wax into the mold ... note that when you pour the wax, you don't want to pour it directly where your glitter is, as it will move it around too much.
Since candles can help to warm your home during the winter and give a "warm" feel to things, they are wonderful gifts and they smell nice too ... so, just think of some ideas you may with to work with, and don't be afraid to experiment! The candle below started off as a chimney candle ... the mold used is from a container of "half & half" ... torn away after the candle molded ... then, a bit of distress to the "chimney" and some snow on top. I may make more of these this year, however, I believe I will leave the gifts off ... my initial thought was that Santa dropped some gifts on his way down the chimney, but then, upon burning the candle, the burning gifts didn't look so good! To make the snow ... wax is melted and then allowed to cool a bit, then whisked with a fork until it begins take form and quickly applied to the top of the candle ... to get a bit of glossy "melting" look ... pour a bit of wax over the top of it. (Make sure you are doing this on a plate or platter, as it can tend to be a bit messy.) Never be afraid to experiment !! As long as you have an open mind as the season gets underway ... you'll be making wonderful candles in time for giving them away!Happy Candle-crafting !!


